
After attaching your cargo rack to your vehicle’s trailer hitch receiver, follow these steps to load and secure your travel trunk to the rack:
1
Place your travel trunk onto the cargo rack
Lift your travel trunk and set it on the cargo rack. This is easiest before it’s filled up. If you prepacked your gear, you may require another person to help lift your trunk onto the cargo rack.
In-molded hand grips are located under the left and right edges of the trunk (near the tie-down slots).
2
Load your items
Distribute weight and contents as evenly as possible to minimize items from shifting during travel. Heavy items should be placed below fragile and flexible items.
Center your travel trunk so the left and right sides are an equal distance from the rails or edges of the cargo rack.
Pro Tip: To quickly center the ExtraTrunk, look at the “T” on the ETC logo. The “T” is in the middle of the box, and when centered on the rack it points straight down to the cargo rack’s central support bar underneath.
3
Use tie-down straps to anchor your travel trunk to the rack

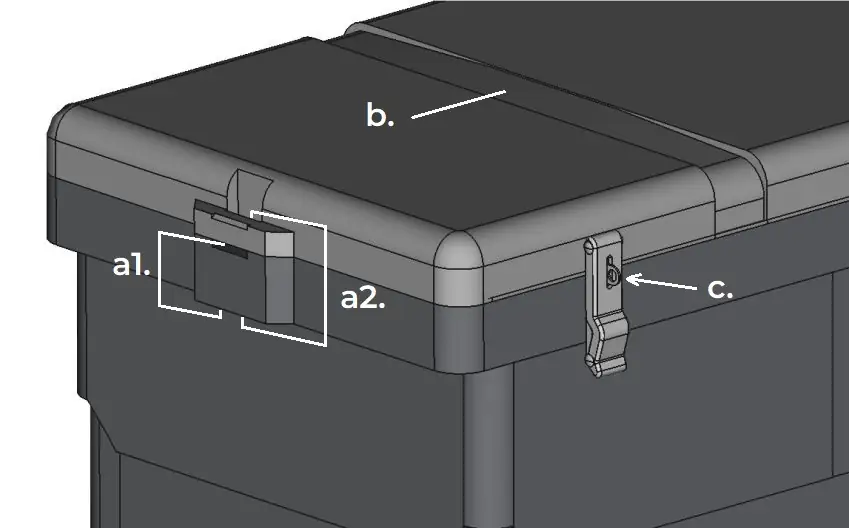
Tie-down slots (figures a1. and a2.) on the left and right sides are used as locations to loop your straps which will anchor your travel trunk to the cargo rack. Tie-down slots fit straps, cables and other fasteners up to 2″ in width.
Using a separate tie-down strap for each side, loop a strap through the tie-down slot and anchor both ends to the cargo rack. Do not over-tighten.
Tie-down channels and tie-down slots can also be used at the same time.
If including additional items on your cargo rack, secure those items to the rack, not to the travel trunk, using a separate set of straps or fasteners.
4
Close & lock the latches
Two lockable draw latches are located on the front of the trunk. Set the top of the latch onto the metal catch located on the lid and push down and inward.
Once they’re latched in place, insert a padlock, carabiner or other locking accessory through the metal loops located on the two latches (figure c.). Locks and accessories are sold separately (not sold by us).

5
Double check your setup
Before you go, look everything over and make sure all equipment is properly attached, including your cargo rack’s connection to the trailer hitch receiver, your straps, latches, and any other accessories you’re using.
Give your straps a tug to make sure they’re snug and anchored to the cargo rack. When everything is good to go, you can hit the road.